This is a complete guide to every pick-up in the HD Remaster of Resident Evil. It is designed to help you achieve 100% completion of all maps in order to unlock the Every Nook And Cranny Trophy/Achievement. We have listed each area in as logical an order as possible, including all items, maps and files that you will encounter on the way. For detailed descriptions of locations, see our Map and File Walkthroughs.
Our guide was compiled on Very Easy as this is the mode which provides maximum pick-up opportunities. If you are playing on a higher difficulty, you will find that your map will turn green to show completion sooner. However, if an area is still red, it is worth cross-referencing with our list as it is likely that you have missed a well-hidden item, map or file.
Enemies do not count towards 100% completion, so you do not have to kill everything on the way. Also, you are not obliged to use up planters of herbs or drums of Kerosene. We have included these items in brackets for your reference.
If you have successfully cleared all areas the Every Nook And Cranny trophy will pop up when you exit the elevator on to the Heliport. The Signal Rockets and possible Rocket Launcher are therefore not required for the trophy, but are obviously important to complete the game.
Dining Room
Ink Ribbon
Emblem
Blue Gemstone - push the statue down from the Upper Dining Room. Note, when you come back from the Residence, you may find that the statue is already smashed on the ground, whether you pushed it or not.
Shield Key - you will get this after completing the clock puzzle
Kenneth Corridor
Kenneth's Film - File
Hall
Jill's Gun - only as Chris
Woman Drawing Water Room
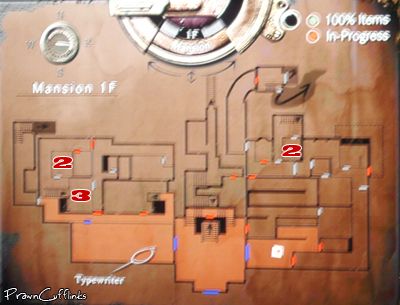
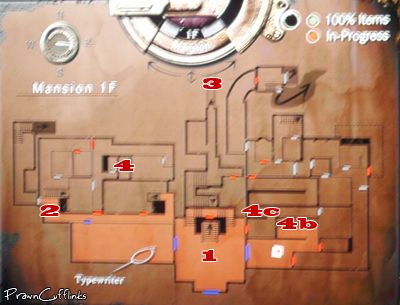
Mansion 1F Map
Dagger - in alcove
Crow Corridor With Birdcage
Green Herb x2
Handgun Magazine
Mirror Corridor
Green Herb x2
Handgun Magazine
Golden Arrow - Arrow Head
Trap Corridor
Armor Key
Upper Dining Room
Dagger
Graveyard
Shotgun Shells
Crypt
Book Of Curses - Sword Key
Book Of Curses - File
Shotgun Shells - after you use the 4 masks
Stone & Metal Object - after you use the 4 masks and kill the Crimson Head
U-Shaped Corridor
Wooden Mount
Study With Gramophone
Dog Whistle
Crumpled Memo - File
Botany Book - File
Handgun Magazine
Lighter - only as Jill
Barry's Save Room Lower Corridor
Green Herb
Barry's Save Room
Fuel Canteen
Handgun Magazine
Handgun Magazine x2 - once there is a note on the wall outside from Barry/Wesker
First Aid Spray x2 - once there is a note on the wall outside from Barry/Wesker
Shotgun Shells - once there is a note on the wall outside from Wesker - only as Chris
Flame Shells - once there is a note on the wall outside from Barry - only as Jill
Old Key - only as Chris
Body Disposal - File - only as Chris
(Kerosene)
Fireplace Room
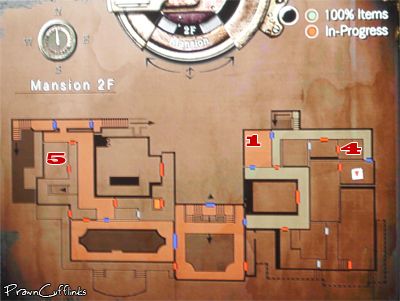
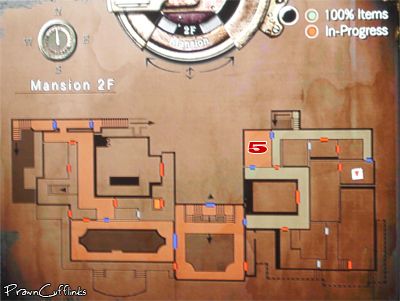
Mansion 2F Map
Green Herb x2
Red Herb
Dog Yard
Dog Collar - Coin - Imitation Key
(Green Herb Planter)
Dog Corridor
Dagger - push chest
Handgun Magazine - push chest
Bathroom Off Close Up Corridor
Dagger - only as Jill
Old Key - only as Chris
Outer Yard
Chemical To Use On Plants
Green Herb x2
Red Herb x3
(Kerosene)
Shotgun Room
Shotgun
Dagger
Ink Ribbon
Rebecca's Save Room
Body Disposal - File - only as Jill
Serum - only available after triggering Richard's cutscene
Kitchen
Dagger - only as Jill
Old Key - only as Chris
Piano Room
Missing Music - push shelf
Ink Ribbon
Gold Crest - in hidden alcove after playing music
Trevor's Diary Part 1 - File - in hidden alcove after playing music
Forest's Veranda
Handgun Magazine
Green Herb x2
Dagger - on bench
Grenade Launcher - only as Jill
Richard's Corridor
Green Herb x2
Knights Puzzle Room
Jewelry Box - Mask Without Eyes, Nose Or Mouth
Stag Head Room
Green Herb
Red Herb
Fishtank Room
Researcher's Will - File
Fish Hook
Lure Of A Bee
Bee Specimen
Wind Crest - after solving the Lure puzzle
Bedroom
First Aid Box
Ink Ribbon
Green Herb - on dark side of bed in line with candle
Old Key - only as Chris
Crow Puzzle Room
Mask Without Mouth - outside after solving the puzzle
Rattling Window Corridor
Dagger
Battery Pack - only as Jill
Grenade - only as Chris
Greenhouse
Green Herb x5 - only if you don't accidentally kill them with the Chemical To Use On Plants
Mask Without Eyes
Tiger Room
Shotgun Shells - if you use the Blue Gemstone
MO Disk - if you use the Yellow Gemstone
Bedroom With Rattling Wardrobe
Handgun Magazine
Keeper's Diary - File
Battery Pack - only as Jill
Old Key - only as Chris
Candelabra Room
Shotgun Shells
Musical Score - combine with Missing Music to get Moonlight Sonata
Broken Shotgun Room
Broken Shotgun
Ink Ribbon
Battery Pack - only as Jill
Grenade - only as Chris
(Kerosene)
Yawn's Attic
Shotgun Shells
Mask Without Nose
Shed
Shotgun Shells
First Aid Spray
Battery Pack - only as Jill
Grenade - only as Chris
First Aid Spray x2 - after returning from the Residence
Shotgun Shells - only as Chris - after returning from the Residence
Acid Shells - only as Jill - after returning from the Residence
Grenade - only as Chris - after returning from the Residence
Crow Graveyard
Sun Crest
Moon Crest
Star Crest
Magnum Revolver
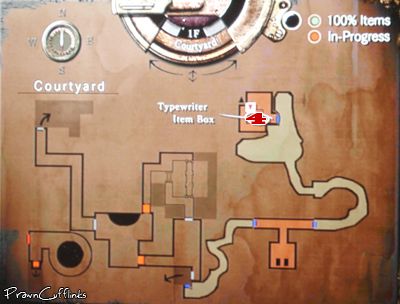
Cabin - Exterior
Green Herb x2
Cabin
Map Of Courtyard
Family Picture & Notes Part 1 - File
Courtyard With Dogs
Green Herb
Blue Herb
Courtyard With Waterfall
Green Herb
(Blue Herb Planter)
Pathway To Residence
Red Herb
Residence Corridor
Blue Herb x3
Residence Save Room
First Aid Spray
Ink Ribbon
Battery Pack - only as Jill
Grenade - only as Chris
(Kerosene)
Pool/Spider Room
Green Herb x2
Shotgun Shells
First Aid Box
Red Book - Unprinted Book
Bee Corridor
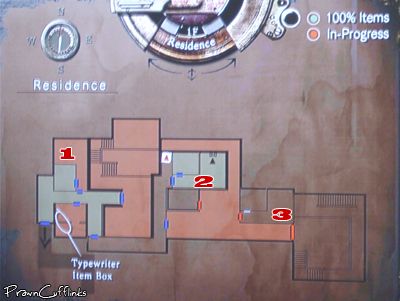
Residence Map
Room 002
Plant 42 Report - File
Key For Room 001 - in bathroom
Room 001
Self Defense Gun
Suicide Note - File
Handgun Magazine x2
Control Room Key - in bathroom
Underground Passage
Green Herb
Aqua Ring
Assault Shotgun - only as Chris if you save Richard with the Serum
Gallery Key
Control Room
Aqua Ring Map
First Aid Box
Exit Passageway
Magnum Rounds
Dynamite Storeroom
Grenade Shells - only as Jill
Shotgun Shells x2 - only as Chris
Gallery
Handgun Magazine
Insecticide Spray
Red Herb x2
Key For Room 003
Chemical Room
Empty Bottle x4
(UMB No.3)
(UMB No.6)
Room 003
Organic Chemical Lab Experiment - File
Ink Ribbon
Dagger - in bathroom
Plant 42 Room
Helmet Key
Room With Moving Walls
Battery Pack - only as Jill
Grenade - only as Chris
Last Book Vol 1 - Medal Of Eagle
Trevor's Diary Part 2 - File
Spider Corridor
Map Of Mansion B1
Shotgun Shells
B1 Corridor
Red Herb
Blue Herb
Dagger
Handgun Magazine
Elevator Corridor
Red Herb
Green Herb x2
Storeroom Off Elevator Corridor
Battery
Magnum Rounds
Acid Shells - only as Jill
Shotgun Shells - only as Chris
Grenade - only as Chris
Bird Puzzle Room
Mail To Chief Of Security - File
Dagger
Red Gemstone
Yellow Gemstone
Explosive Shells - only as Jill
Shotgun Shells - only as Chris
Art Room
Ink Ribbon
Trevor's Diary Part 3 - File
Mirrored Wall Room
Jewelry Box - combine with Red Gemstone - Brooch - Spencer Family Emblem Key
Green Herb
Dagger
(Blue Herb Planter)
Yawn's Library
Green Herb x2
Last Book Vol 2 - Medal Of Wolf
Spencer Family Room
Metal Object
Shotgun Shells - in drawer
Battery Pack - only as Jill
Slippery Slimey Cave
Blue Herb
Green Herb
Ink Ribbon
First Boulder Corridor
Acid Shells - only as Jill
Shotgun Shells - only as Chris
Elevator Chamber
Handgun Magazine x2
Green Herb
Shaft
Enrico's Corridor
Hexagon Crank
Flamethrower Corridor
Flamethrower - only as Chris
Shotgun Shells
Black Tiger Room
Survival Knife
Corridor Outside Black Tiger Room
Map Of Courtyard B1
Green Herb
Blue Herb x2
Third Boulder Corridor
First Aid Box
Turntable Room
Cylinder - combine with Shaft - Cylinder Shaft
Trash Compactor
Broken Flamethrower - after getting and crushing the box from the Material Transport Room
Handgun Magazine
Lisa's Circular Path
Red Herb
Green Herb
Material Transport Room
Magnum Rounds - climb up boxes
Handgun Magazine - climb up boxes
Battery Pack - only as Jill - climb up boxes
Grenade - only as Chris - climb up boxes
Lisa's Bedroom
Jewelry Box - Stone Ring
Family Picture & Notes Part 2 - File
Dagger
Corridor Above Lisa's Bedroom
Green Herb
Blue Herb
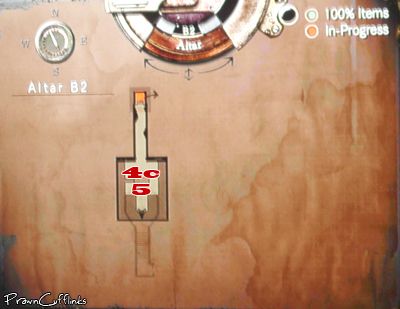
Altar
Family Picture & Notes Part 3 - File
(Barry's Picture & Notes - only as Jill if you choose "no")
(Barry's .44 Magnum - only as Jill if you choose "no")
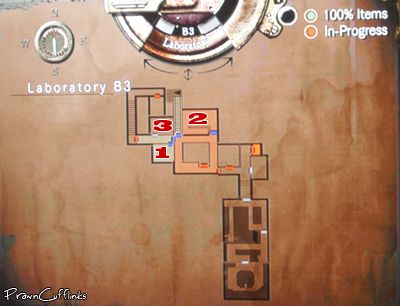
Laboratory Entrance Save Area
Ink Ribbon
Lab Corridor B2
Green Herb x3
MO Disk
(Kerosene)
Square Corridor
Dagger
Handgun Magazine
Prison Entrance Corridor
First Aid Box
X-Ray Room
X-Ray x2
Researcher's Letter - File
Small Security Room
V-ACT - File
Magnum Rounds
First Aid Box
Battery Pack - only as Jill
Grenade - only as Chris
Visual Data Room
Map Of The Laboratory
Security Protocols - File
First Aid Spray
MO Disk
Shotgun Shells
Power Area Key - in secret area
Fuel Storage Room
(Fuel)
FAX- File
Ink Ribbon
Incendiary Shells - only as Jill
Magnum Rounds - only as Chris
Slide Filter
Operation Room
Shotgun Shells
Battery Pack - only as Jill
Grenade - only as Chris
Lab Lounge
First Aid Spray
Ink Ribbon
Shotgun Shells
Explosive Shells - only as Jill
Magnum Rounds - only as Chris
Power Room 1
Fuel Supply Capsule
Power Room 2
Battery Pack - only as Jill
Grenade - only as Chris
Elevator Corridor
Shotgun Shells x2
Tyrant Room
Observation Note - File
(Master Key - only if you're alone)
Cell
Shotgun Shells
Emergency Passageway
Shotgun Shells
First Aid Box x2
Fuse Unit